- 800.525.2690
- [email protected]
- Mon - Fri: 8:00 - 4:30
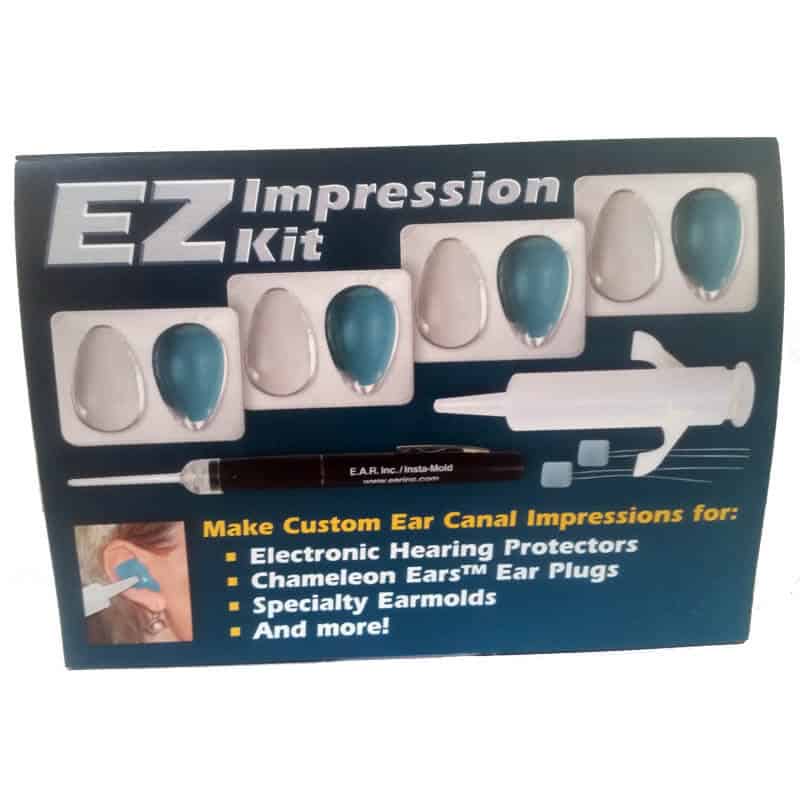
 When you need customized hearing protection or hearing aids you must first have a mold made of your ear canal. These molds, called impressions, are required by the laboratory, but they can be difficult to obtain if you are unable to find a provider or facility to make them for you. To meet this need, E.A.R. has created the EZ Ear Impression Kit.
Once you have your ear impressions, they can be used to make a variety of custom hearing instruments, from hearing protection to noise or water plugs to professional and recreational music monitors.
If you are uncomfortable making your own ear impressions, and we do not have a provider near you, we recommend having them made by a local audiologist or hearing health care provider.
| Weight | .9 lbs |
|---|---|
| Dimensions | 7 × 5 × 4 in |
How to Make Ear Molds (Video)
If you’re not sure how to make custom ear impressions, watch this video for help using the EZ Ear Impression kit or read the steps below:
These are the steps:
-
Inspect the ear canal. Use an otoscope to check for wax buildup or obstructions. Don’t have one? Browse our collection of digital otoscopes.
-
Insert the oto block. Place the foam block with a retrieval string into the ear canal to prevent impression material from reaching the eardrum.
-
Prepare the impression material. Mix the two-part silicone putty until the color is uniform.
-
Load the material into the syringe. Fill the provided syringe with the mixed silicone.
-
Inject the material into the ear. Slowly and evenly inject the silicone into the ear canal, ensuring full coverage of the canal and outer ear.
-
Allow the material to set. Wait approximately 5–8 minutes for the silicone to cure.
-
Remove the impression. Gently pull on the retrieval string to remove the cured impression from the ear.
-
Inspect the impression. Check for completeness and absence of voids or imperfections.
-
Package and send the impression. Place the impression in the provided mailing box and send it to the lab using the prepaid label.
FAQ
How much do custom ear impressions cost?
Ear impressions typically cost between $50–$75 at most audiology clinics. With the EZ Ear Impression Kit, you can safely take your own impressions at home and save on clinic fees.
Are ear impressions safe?
Yes, ear impressions are completely safe when done properly. The kit includes a blocker to protect your eardrum and detailed instructions to ensure accuracy. If you feel discomfort, stop and consult a professional audiologist.
What is the best material for ear impressions?
Most audiologists prefer medical-grade silicone for its comfort, accuracy, and quick-setting properties. The EZ Ear Impression kit from EAR Inc. uses the same high-quality, hypoallergenic material trusted by hearing specialists.
Can I take my own ear impressions at home?
Yes, you can make ear impressions at home with the EZ Ear Impression Kit. It’s designed for DIY at-home use and includes everything needed to take your own impressions safely and accurately, including otoblocks, silicone impression material, a syringe, step-by-step instructions, and a prepaid mailer for lab processing.